Festive Rudolph Reindeer Cookies with Spiced Biscoff Filling: The Ultimate Holiday Linzer Treat
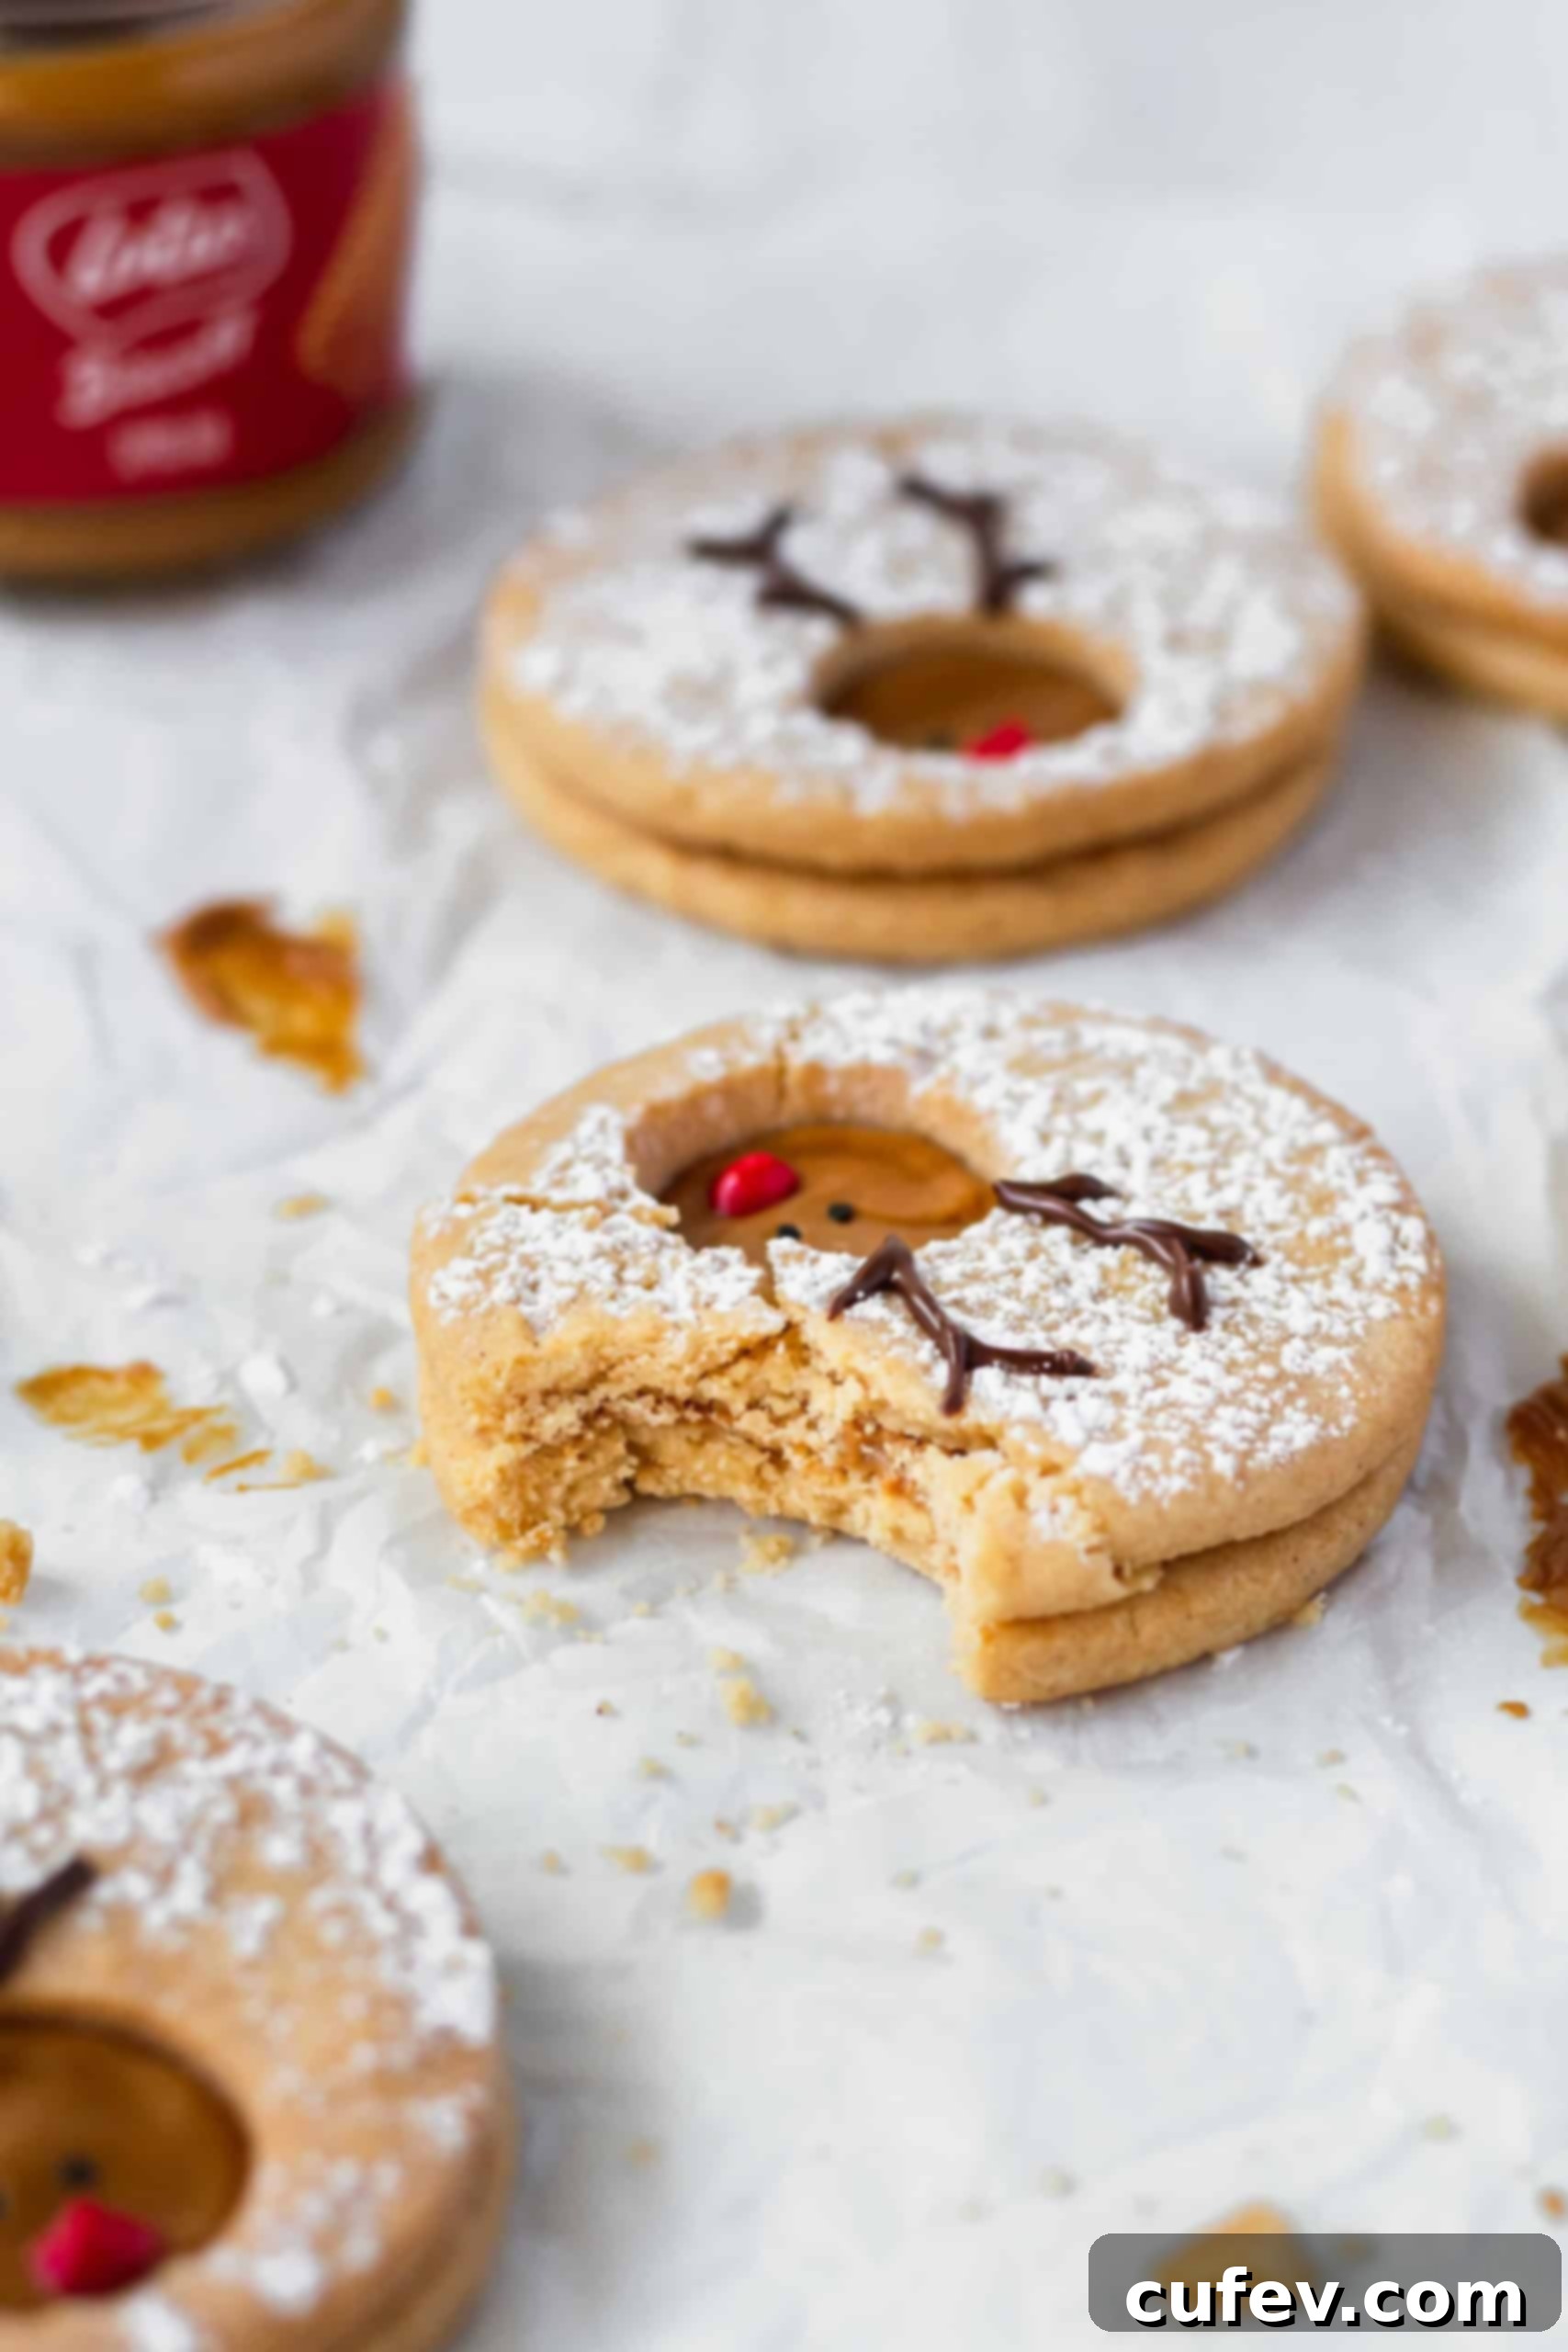
Step aside, ordinary festive treats! This holiday season, delight your family and friends with these enchanting Rudolph Reindeer Cookies. These aren’t just any Christmas cookies; they’re an extraordinary blend of tender, crisp almond butter cookies lovingly sandwiched together with a rich, spiced Biscoff cookie spread. Each bite offers a harmonious symphony of buttery almond flavor perfectly complemented by the warm, caramelized notes of cookie butter, making them an undeniably unforgettable holiday indulgence. They are a festive twist on traditional Linzer cookies, transforming a classic into a charming, character-filled delight that’s as fun to make as it is to eat.
Imagine the joy on everyone’s faces when they discover these adorable Rudolph cookies, each adorned with a sweet, edible face. Whether you’re planning a holiday cookie exchange, seeking a special treat for Santa, or simply wanting to infuse your home with the magic of Christmas baking, these reindeer cookies are guaranteed to be the star of your dessert table. Their unique flavor profile and charming appearance make them a standout addition to any holiday celebration, creating cherished memories with every delicious bite.

This post was originally published on November 7, 2020, sharing the initial joy of this festive recipe. It was comprehensively updated with new recipe information, enhanced tips, and detailed instructions on December 6, 2023, to ensure the best possible baking experience for you.
Essential Ingredients for Your Rudolph Reindeer Cookies
Crafting these delightful Rudolph Reindeer Cookies requires a selection of quality ingredients that come together to create their unique texture and flavor. Each component plays a crucial role in achieving that perfect balance of crispiness, tenderness, and spiced sweetness.
- Biscoff Cookie Spread – The star of our filling, this creamy spread is famously made from Lotus Biscoff cookies. Also widely known as cookie butter, it delivers a sweet, distinctly spiced flavor with prominent cinnamon notes. It’s the ideal complement to our almond cookies, providing a luscious, flavorful center. You can readily find Biscoff cookie spread at most major grocery stores in the jam or peanut butter aisle, and it’s also conveniently available for purchase online.
- Almond Flour – For the lightest, crispiest cookies, it’s essential to choose finely ground almond flour over coarser almond meal. The finer texture of almond flour ensures a delicate crumb and contributes significantly to the cookie’s tender yet crunchy bite.
- Unsalted Butter – Using unsalted butter gives you complete control over the salt content in your cookies, as different brands of salted butter vary greatly. For optimal texture and consistency, always bring your butter to room temperature before creaming. This ensures it incorporates smoothly with the sugar, creating a light and airy base for the cookie dough.
- Light Brown Sugar – The molasses content in light brown sugar is key to these cookies, adding both moisture and delightful caramelized notes. This not only enhances the flavor profile but also creates a wonderfully soft and chewy texture that serves as the perfect canvas for the spiced Biscoff cookie spread.
- Egg – A large egg acts as a crucial binding agent, holding the cookie dough together and preventing it from crumbling. It also enriches the cookie’s flavor, adding a foundational richness that elevates the overall taste.
- Vanilla Extract – For the most authentic and robust flavor, pure vanilla extract is highly recommended. It enhances the sweetness and adds a warm, aromatic depth that is essential in any delicious cookie recipe.
- Ground Cinnamon – This warm spice is indispensable for that perfectly Christmasy aroma and flavor. Cinnamon pairs beautifully with the Biscoff spread and almond cookies, infusing every bite with comforting holiday cheer.
- Powdered Sugar – Essential for dusting the finished cookies, powdered sugar provides a delicate sweetness and a beautiful, snowy appearance, mimicking freshly fallen snow. It’s the perfect finishing touch, adding to their festive charm.
- Chocolate Chips – Or, if you prefer, candy melts. These are melted down and used to delicately draw Rudolph’s iconic eyes and antlers onto the cookies, bringing these sweet reindeer to life.
- All-Purpose Flour – The foundational flour that provides structure to our cookies. Combined with almond flour, it creates a balanced texture that is both tender and sturdy enough to hold its shape.
- Fine Salt – A pinch of fine salt is crucial for balancing the sweetness of the cookies and enhancing all the other flavors. It brightens the profile and prevents the cookies from tasting one-dimensionally sweet.

Crafting Your Reindeer Cookies: A Step-by-Step Guide
While these reindeer Linzer cookies involve a few distinct steps, the process is straightforward and incredibly rewarding. The final result—buttery, cinnamon-spiced, and Biscoff-filled cookies—is truly worth every moment of effort. Follow these simple steps to bring your adorable Rudolph Reindeer Cookies to life this holiday season.
- Cream the Butter and Sugar: In a large mixing bowl, begin by creaming together the softened unsalted butter and light brown sugar. Beat these two ingredients until the mixture is light, fluffy, and pale in color. This step is crucial for incorporating air into the dough, which contributes to the cookies’ light texture.
- Add Wet Ingredients: Next, incorporate the vanilla extract and the large egg into the creamed butter and sugar mixture. Continue beating until all ingredients are thoroughly combined and the mixture is smooth and cohesive.
- Whisk Dry Ingredients: In a separate, medium-sized bowl, whisk together the all-purpose flour, almond flour, fine salt, and ground cinnamon. Ensure these dry ingredients are well combined to guarantee even distribution throughout the dough.
- Combine and Chill Dough: Gradually add the whisked flour mixture to the butter mixture, mixing on low speed until just combined. Be careful not to overmix, as this can lead to tough cookies. Once a cohesive dough forms, cover the bowl tightly with plastic wrap and refrigerate for at least 2 hours. Chilling the dough is essential for preventing spreading during baking and making it easier to handle.
- Roll Out the Dough: After chilling, remove the dough from the fridge. Place the cookie dough between two sheets of parchment paper. Using a rolling pin, roll out the dough evenly until it is approximately ⅛ inch (or ⅓ cm) thick. The parchment paper prevents sticking and makes transfer easier.
- Quick Freeze for Firmness: Once rolled, place the entire sheet of dough (still between parchment paper) into the freezer for about 5 minutes. This brief chill helps the dough solidify slightly, making it much easier to cut out clean shapes without distortion.
- Cut Cookie Shapes: Using a 3-inch (8-cm) round cookie cutter, cut out your cookie shapes. If at any point the dough becomes too soft and difficult to work with, simply pop it back into the freezer for another 5 minutes. Carefully transfer the cut-out cookies onto a baking sheet lined with parchment paper. Gather any dough scraps, re-roll them gently, and cut out more shapes until all the dough is used.
- Create Linzer Cutouts: For approximately half of your circular cookies, use the wider end of a jumbo piping tip or a small round cutter to create a smaller circular cutout in the center. These will form the top layer of your Linzer-style cookies, allowing the Biscoff filling to peek through.
- Bake to Golden Perfection: Preheat your oven to 325°F (160°C). Bake the cookies for about 18 to 20 minutes, or until the edges are lightly golden. The exact baking time may vary depending on your oven, so keep a close eye on them. Once baked, let the cookies cool on the baking sheets for about 10 minutes before carefully transferring them to a wire rack to cool completely. This prevents them from breaking and ensures they set properly.
- Assemble and Decorate: Once completely cooled, lay out all the cookies with the central cutouts on a clean surface and lightly dust them with powdered sugar. Take the solid cookies (without cutouts) and spread a generous layer of Biscoff cookie spread on one side. Carefully place a powdered-sugar-dusted cutout cookie on top of each Biscoff-smeared cookie, creating a delicious cookie sandwich. Finally, melt your chocolate chips or candy melts and use a fine-tipped brush, toothpick, or piping bag to draw Rudolph’s adorable eyes and antlers on each cookie, completing their festive transformation!

Pro Tips for Perfect Rudolph Reindeer Cookies
Achieving bakery-quality Rudolph cookies is easier than you think with a few key strategies. These tips will help ensure your cookies are perfectly shaped, wonderfully textured, and utterly delicious.
- Chill the Cookie Dough Thoroughly. This step is paramount for well-structured cookies. Chilling allows the flour to fully hydrate, leading to a superior texture and preventing the cookies from spreading too much in the oven. Additionally, letting the rolled-out dough chill briefly in the freezer before cutting makes the dough firm and easier to handle, resulting in perfectly shaped cut-outs that retain their intricate details.
- Roll Out the Cookie Dough Evenly. Consistency in dough thickness is critical for uniform baking. Cookies rolled to an even thickness will bake at the same rate, preventing some from being underbaked while others are overbaked. For best results, consider using a rolling pin with thickness guides, or regularly check the dough’s thickness with a ruler to ensure it’s uniform across the entire sheet.
- Cool the Cookies Completely Before Filling. Patience is a virtue when it comes to Linzer-style cookies. Not only will fully cooled cookies be less fragile and easier to handle during the assembly and decorating process, but they also prevent the Biscoff cookie butter from melting. A melted filling can lead to a messy presentation and a less satisfying texture. Ensure your cookies are entirely at room temperature before adding the spread.
- Melt Chocolate Carefully. When melting chocolate chips or candy melts for Rudolph’s face, care is essential to prevent burning. Use a microwave on low power, heating in short 15-30 second intervals and stirring well after each interval until smooth. Alternatively, a double-boiler method offers gentle, even heating. Stir continuously to ensure the chocolate melts smoothly without seizing or scorching.
- Use Parchment Paper. Always line your baking sheets with parchment paper. This prevents sticking, promotes even baking, and makes for easy cleanup. It also helps in easily transferring delicate cookies without breakage.
- Don’t Overmix the Dough. After adding the dry ingredients to the wet, mix only until just combined. Overmixing develops the gluten in the flour, which can lead to tough, chewy cookies instead of the desired tender and crisp texture.

Storing Your Rudolph Reindeer Cookies
Proper storage is key to keeping these festive treats fresh and delicious, allowing you to enjoy them for days to come or save them for a later celebration.
Storage: Once assembled and decorated, any leftover Rudolph Reindeer Cookies should be stored in an airtight container at room temperature. They will remain fresh and delightful for approximately 3-4 days. To maintain their best texture and prevent them from drying out, ensure the container is sealed well.
Freezing: For longer preservation, these Rudolph cookies can be frozen. Place them in a single layer on a baking sheet to flash freeze for about an hour until firm, then transfer them to a freezer-safe airtight container or a heavy-duty freezer bag. They can be stored in the freezer for up to 3 months. When you’re ready to enjoy them, simply remove them from the freezer and allow them to defrost at room temperature for 15-30 minutes before serving. This method is great for preparing ahead of holiday gatherings!
Frequently Asked Questions About Rudolph Reindeer Cookies
Also known as Linzer tart cookies, Linzer cookies are a beloved type of cookie sandwich that traces its origins to Linz, a charming city in Austria. Traditionally, these cookies feature a sweet, fruity jam—often black or red currant—sandwiched between two rich, buttery almond cookies. The distinguishing characteristic is the small cutout, often referred to as the “Linzer eye,” in the top cookie layer, allowing the vibrant jam filling to peek through. This cookie is actually a miniature version of the famous Linzertorte, a larger tart that uses similar ingredients and is traditionally topped with an elegant lattice crust. Our Christmas Linzer cookies draw inspiration from this classic, maintaining the crisp almond cookie base but innovatively substituting the jam with a warm, spiced Biscoff cookie spread, all while adding the adorable Rudolph decorations for a festive twist.
Yes, absolutely! If you’re looking to save time, using good quality store-bought cookie dough is a convenient option. You can roll out the pre-made dough, cut out the desired circular shapes, and then proceed to bake them according to the package instructions. Once the cookies have baked and cooled completely, you can then assemble them with the delicious Biscoff spread and add the charming Rudolph decorations as outlined in our recipe. This makes the process even quicker, perfect for busy holiday schedules.
While I haven’t personally experimented with making this specific Rudolph Reindeer Cookie recipe entirely without eggs and dairy, you could certainly try! For the egg, a flax egg (1 tablespoon ground flaxseed meal mixed with 3 tablespoons water, allowed to sit for 5 minutes) is a common substitute. For a fully vegan option, you might consider adapting this vegan and gluten-free cookie recipe from my site, which is already dairy and egg-free, and then cut out the Linzer holes to create Rudolph’s face. Remember that results may vary slightly when making substitutions.
If you reside in a particularly warm or humid climate, I highly recommend storing these cookies in an airtight container within the refrigerator. The Biscoff spread filling, while generally stable, and the chocolate decorations can become soft or even melt if exposed to high temperatures for extended periods. Refrigeration will help to keep the filling firm and the chocolate decorations intact, ensuring your Rudolph cookies maintain their festive appearance and delicious texture.
Absolutely! Freezing cookie dough is an excellent way to prepare ahead of time. I would advise rolling out the dough as instructed in the recipe and then freezing it in a tightly wrapped disc or between parchment paper. This makes it much easier to cut out the shapes later without needing to re-roll stiff, cold dough. Ensure it’s well-wrapped to prevent freezer burn, and it can be stored in the freezer for up to 3 months.
If your cookies are softer than desired, it usually indicates they may not have baked long enough, or your oven temperature might be slightly off. You could try baking them for an extra minute or two during your next batch. Additionally, ensuring your oven is accurately calibrated can help. Sometimes, differences in ingredient temperatures or even humidity can affect texture, but generally, a slightly longer bake time is the simplest solution for a crisper cookie.

Discover More Festive Christmas Recipes
Looking for more delicious ways to celebrate the holiday season? Explore these other delightful Christmas-inspired recipes, perfect for sharing, gifting, or simply enjoying with a warm cup of cocoa:
- If you’re craving a delicious and effortlessly made Christmas treat, don’t miss these chewy and aromatic gluten-free Christmas cookies! They boast lovely notes of vanilla and refreshing peppermint.
- For a uniquely festive and subtly flavored cookie, these matcha Christmas tree cookies are a must-try. They are buttery and crisp, with just the right amount of vibrant matcha flavor.
- Searching for ginger cookies that deliver on spice without needing molasses? These wonderfully chewy gluten-free ginger cookies, complete with a delectable maple glaze, are perfectly spiced and incredibly satisfying.
- This incredibly easy-to-make dairy-free fudge is so rich and creamy, no one will even guess it’s dairy-free! It’s a fantastic option for those with dietary restrictions or simply looking for a lighter holiday treat.
- If classic cookie recipes are what you’re after, be sure to try these beloved gluten-free oatmeal cookies or the quintessential gluten-free chocolate chip cookies! Both recipes promise that ideal cookie texture – perfectly crisp edges with delightfully soft and chewy centers.

Rudolph Reindeer Cookie Recipe
Ingredients
- ¾ cup unsalted butter softened to room temperature
- ½ cup light brown sugar
- 1 large egg
- 1 teaspoon vanilla extract
- 1½ cups all-purpose flour
- ¾ cup almond flour
- ½ teaspoon fine salt
- 1 teaspoon ground cinnamon
- 7 oz Biscoff spread
- powdered sugar, for dusting
- chocolate or candy melts, for drawing Rudolph’s face
Instructions
-
In a large bowl, cream the softened unsalted butter and light brown sugar until light and fluffy. Add the vanilla and egg, then beat until the mixture is smooth and well combined. Set aside.
-
In a separate bowl, whisk together the all-purpose flour, almond flour, salt, and cinnamon until thoroughly combined. Gradually add this dry mixture to the butter mixture, stirring until just combined to form a soft dough. Cover the bowl and let it rest in the fridge for at least 2 hours to firm up.
-
Place the chilled cookie dough between two sheets of parchment paper. Using a rolling pin, roll the dough evenly until it is approximately ⅛ inch (or ⅓ cm) thick. For easier handling and cutting, stick the rolled-out cookie dough (still between parchment paper) into the freezer for 5 minutes to solidify slightly.
-
While the dough is chilling for its final few minutes, preheat your oven to 325°F (160°C).
-
Using a 3-inch (8cm) circular cutter, cut out your cookie shapes. If the dough begins to soften and become difficult to work with, place it back in the freezer for another 5 minutes before continuing. Carefully transfer the cut-out cookies onto a baking sheet lined with parchment paper.
-
For roughly half of the cookies, use the wider end of a jumbo piping tip or a small round cutter to create a central cutout. This will be for the top layer of your Linzer cookies. You can gather any dough scraps, gently re-roll them, and cut out additional shapes as needed, ensuring minimal waste.
-
Bake the cookies in the preheated oven for approximately 18 to 20 minutes, or until the edges turn a delicate golden brown. Allow them to cool on the baking sheets for about 10 minutes to firm up before carefully transferring them to a wire rack to cool completely.
-
Once fully cooled, arrange all the cookies with the central cutouts on a surface and lightly dust them with powdered sugar. Next, take the solid cookies (without cutouts) and spread a generous layer of Biscoff spread on one side. Gently place a powdered-sugar-dusted cutout cookie on top of each Biscoff-smeared cookie, creating your adorable cookie sandwiches.
-
Finally, using some carefully melted candy melts or chocolate, draw Rudolph’s characteristic eyes and antlers onto the top cookie, bringing your festive reindeer to life!
